Our website is supported by our users and contains affiliate links. We get paid when you purchase or sign up for anything through those links. Read the full disclaimer for more information.
Last Updated on October 26, 2020 by Yovana
If you have recently started planning out your blog and are wondering how to get your text to look a certain way, then you are looking for ways to add custom fonts to your blog. I have heard a lot of new bloggers stress how they do not know how to do this and I think it is something fun that all bloggers should know for any design purposes. So how to add custom fonts in WordPress? In order to add custom fonts to your site or blog you need to add a snippet of the custom fonts code to your site’s header. If you have never done any web development or basic html editing before, you may have no idea what I am talking about and I don’t blame you. That is why I am here, to walk you through the tech garbage and straight to the good stuff.
If you have not yet started a blog and want to, or are having trouble with where to start, check out How To Create A Self Hosted WordPress Blog. If you sign up for Bluehost with my link you get a free domain, free site builders, free 1-click WordPress install, 24/7 support and all for only $2.95 a month! You really can’t beat that deal. I have already made $3000 from affiliate marketing alone after only 6 months of blogging, thanks to the Making Sense Of Affiliate Marketing course.
Here are some free blogging resources that have helped me on my blogging journey. Maybe they can help you too?
The Ultimate Blogger Freebie Master List
Sign up to get this master list of the top freebies for bloggers; free stock photos, checklists, courses, guides, planners, etc.
Custom fonts are easier to add to your site than you may think. I am here to tell you how to easily add custom fonts to your WordPress theme or just your regular old site (that may not be WordPress). You will be adding your custom fonts in no time and will be able to mix and match all you like. Be careful though, adding too many custom fonts can slow down the speed of your site as they can take up a lot of resources.
Table of Contents
Here is your easy to follow guide on how to add custom fonts in WordPress.
Custom fonts are easy and fun to use. You can even use WordPress custom font plugins to help you out.

You know those cute fonts you always see in PicMonkey or Canva and wondered how you can get the font on your site to match the cute fonts you have been using in your images? Well I am about to show you exactly that!
Some themes actually include some font customization in the theme options themselves. Check them out here: How To Create A Beautiful Blog Using Free WordPress Themes.
Search for fonts to use.
Search for fonts in Google Fonts, a popular resource to find high quality fonts for free. I personally love Creative Market for fonts. Creative Market has tons of high quality font bundles for pretty cheap.
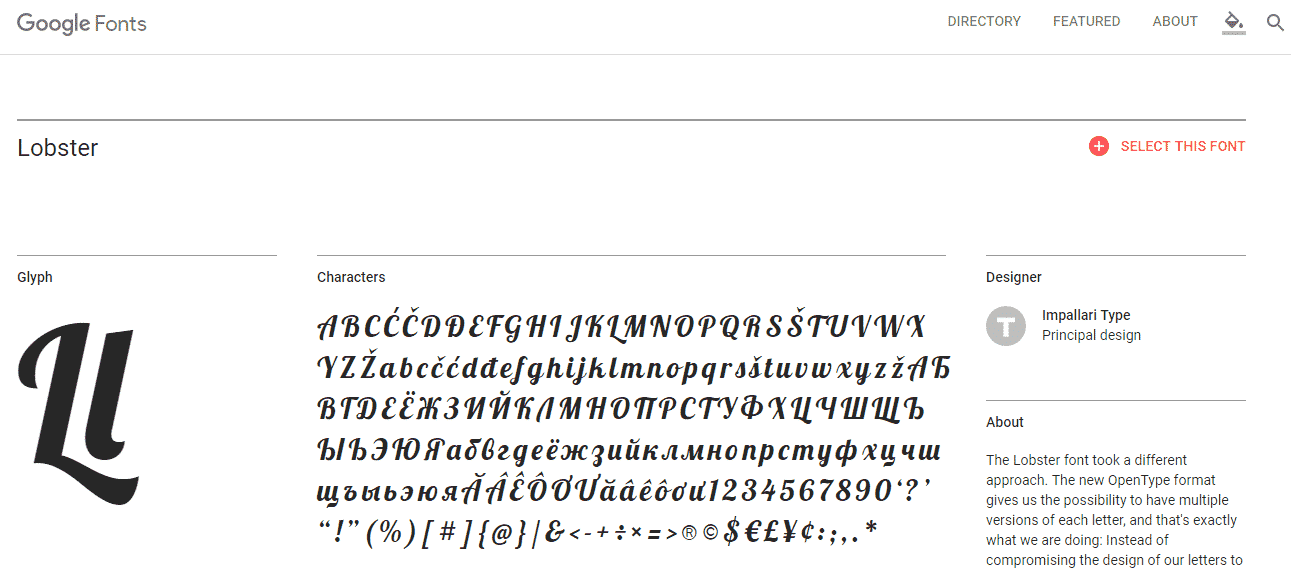
Once you search and find the font you want in Google Fonts, select the font by clicking ‘Select this font’.

Copy/paste the code given.
In Google Fonts, you need to copy the embed code under the font-family selection tab and paste it in your theme’s header.php file right after <head> tag. An easy way to get to your theme’s header.php look at your left sidebar in WordPress, select ‘Appearance’->’Editor’, then select ‘header.php’ from the file list on the right. Add the ‘<link href=”https://fonts.googleapis.com/css?family=Lobster” rel=”stylesheet”>’ to right after the <head> tag and click save.
Next, add the CSS portion to your stylesheet, found in the same list of your theme’s files as your header.php. It is usually called style.css or styles.css.
For example add your new font in your stylesheet as either:
.h1 post-title{font-family: ‘Lobster’, cursive;} or .h1 site-title{font-family: ‘Lobster’, cursive;} or whatever class you want the theme to show up as.
The Ultimate Blogger Freebie Master List
Sign up to get this master list of the top freebies for bloggers; free stock photos, checklists, courses, guides, planners, etc.
If you want to add fonts from Creative Market.
Adding fonts from Creative Market will be much similar to adding fonts from google fonts except you can either download the .otf and .ttf font files or sync them to your dropbox. Include them in your theme files by uploading them via FTP in you have downloaded them. You can use free FTP tools such as Filezilla to do this. If you were wondering, FTP stands for File Transfer Protocol.
If you synced them to your dropbox, you will just change the <link href=”link to your dropbox” rel=”stylesheet”> to link to your drop box location of the synced font files.
Upload the new font to a directory called ‘fonts’ so you can easily find it.
Including the fonts in your header.php will look like this <link href=”/fonts/Light Butterfly.otf” rel=”stylesheet”> and <link href=”/fonts/Light Butterfly.ttf” rel=”stylesheet”> depending on where you have uploaded your new custom font files in your site’s theme files via FTP.
Add the font-family the same way mentioned above to your stylesheet.
If you do not have WordPress.
Add your new font the same ways as mentioned above except this time use your header.html and copy/paste the necessary ‘link href’ code after the <head> tag. Follow the same directions for adding the code to the stylesheet.
That is all you have to do to add your new custom fonts. Now, you are good to go.
Make it easier with WordPress custom font plugins.
There are 2 WordPress custom font plugins I have come across that are absolutely marvelous for people with no CSS or HTML knowledge. These make it extremely easy for those people to use and add custom fonts to their WordPress site with out any learning curve. Sometimes, we just don’t have the time to learn all this new stuff.
Easy Google Fonts WordPress Plugin
You can easily add custom google fonts with Easy Google Fonts, preview them in the live customizer and create custom font controls in the admin area. No CSS or HTML experience required. Click here to download and start playing around the the plugin now.
Use Any Font WordPress Plugin
Use any custom fonts you wish and give your site a premium and elegant look with no CSS knowledge required. Click here for Use Any Font working demo and get an idea of how the plugin works. You can use uploaded fonts directly from the WordPress Editor or Divi Builder and any visual builder using the class. Fonts can also be uploaded directly from the theme options panel.
No rocket science required!
Related:
How To Create A Self Hosted WordPress Blog
21 Top Tools To Help Boost Your Blog
How To Create A Beautiful Blog Using Free WordPress Themes
How To Create Killer Blog Posts
The Top 11 Resources For Free Stock Photos
How To Create Your Very Own Logo For Free
How To Create Stunning Images For Your Blog In 5 Minutes
The Ultimate Blogger Freebie Master List
Sign up to get this master list of the top freebies for bloggers; free stock photos, checklists, courses, guides, planners, etc.

Daniella is the creator and author of iliketodabble.com. When their wife Alexandra and them aren’t globetrotting or playing with their 7+ animals, they are dabbling and working towards a future of financial freedom.


This is actually useful, thanks.
Good to hear it!
Hi! Thank you so much for this post! It is exactly what we are looking for! I absolutely don’t like Times New Roman that we got with our theme and really want to change it! Now I know how)
Cheers!
Really great guide! I’ve always loved how the simple change of a font can give an entirely new feeling and impression to a site.
This is for sure pinned. When I was first starting out, I spent hours trying to do this and never figured out a truly easy way. This is a great reference to make things work smarter rather than harder. Thanks.
Great post! Very informative as always. I learn so much from your posts. I really appreciate you sharing all of this information.
This is awesome, it sounds so easy now! I will have to try this out with some fonts that I want.
I love this! I have a wordpress site and beyond making my own images I didn’t know I could add fonts. I’m scared to touch design stuff by myself but am growing my confidence as the years go by.
Very well written guide! This will be so helpful for those switch over to WordPress from blogger. I would have loved to have this guide when I made the switch.
Awesome information! I have wanted to download fonts but was not exactly sure what to do next with them. Saved and pinned your post. Very handy to have!
I am certainly going to try this out because I have been looking for a certain font that my theme doest have. Thanks for this informative tutorial.
This is very very helpful. I remember trying to figure this out a few months ago.
I love changing up the fonts on my website! Your tutorial is great for someone who wouldn’t have known about this!
I really need to grow in my design skills. Using custom fonts just makes my blog look so much better and have its own look.
I love Creative Market. They are great for inspiration and for finding great designs and fonts you can use on your blog.
This tutorial is so helpful. I’ve often thought about expanding the font choices in my posts and on my blog and now I know exactly how to do it.
Before, I didn’t want to believe it because I just thought I’d be the only one to see the changes and those that didn’t have the font saved in their computer would see the default font for the site. This is so nice!
That’s pretty awesome. It’s definitely a good hack to learn especially if you want to improve your blog more. I think it’s really cool!
I’ve never used custom fonts, but it looks really easy to do! I’ll keep this article in mind for future blog posts.
Such useful tools, little things like fonts can sometimes feel like the hardest thing to change x
I still haven’t out my head about all the blogging tools. This one is very helpful for me.
Nice one. And hope this will help the people to customize their WP site fonts especially for freshers i think. Thank you very much for providing this one here.
Thank You, I was searching for this feature for my friend’s website. I can use it there, he run his website in WordPress. Thank You for sharing!
I have been wanting to change my font for my blog posts. I haven’t figured out how to do it until then, thanks!
I needed this! I am very particular about fonts! I like many of the options I have with my theme, but I would definitely change it up. Now I will. I can completely figure this out. Thank you so much for the tutorial!
I was happy with the fonts I had been using but the possibility to change is a great idea with these choices. These options are a good idea and this post will help me.
Creative Market has been amazing! I’ve been working a lot on my blog layout, so your post came at the right time!
Wow, thank you so much for these tips! I’m gonna work with it. Thanks for sharing and keep on writing. Love your blog! <3
This is really helpful! There are so many things WordPress that are still a mystery to me!
Super excited to play around with this. Thanks for sharing. Very helpful.
These are really helpful tips and I have pinned it for later as well. I would like to make the switch from free to self hosted soon and these tips will definitely come in handy. Thank you!
Fonts are so hard to choose, especially when designing your webspace. I wish I had this info when I was working in wordpress!
This is really great info! So, once I do this the font is always available as a selection??
If you use the plugins you will be able to select it as an option for a header or body text in your editor. If you add it manually you will have to set the specific style in your stylsheet for headers or body text. If you have no experience with this, use the plugins. That is why I included them.
OMG I had no idea that I could change the font on my site. Now I need to sit down and try this on my site this weekend.